Lab 1: Setup; Using Git
Due Date: January 14
Objectives
- Get student laptops ready to build applications
- Install and configure Git on your laptop
- Learn basic Git functions through exercises
- Get students acclimated to using the PaizaCloud IDE
Due Date: January 14
Objectives
This semester in 272, we will be using a new, online, platform called PaizaCloud to build and run our web applications. This allows people on Windows, Mac, or Linux to run code in the same environment which will dramatically reduce time and frustrations on installing different pieces of software. Also, because of a standardized environment, the TA and CAs can be more helpful in issues that may arise in building code.
If you really want to use your local machine, you can use Visual Studio Code [https://code.visualstudio.com/].
Signup yourself with your andrew email to https://paiza.cloud/en/

PaizaCloud will send you a verification email, please verify your email using the link that they sent you. Now, you will be able to login with your email id and password.

Now go to yourusername menu displayed on the top right hand and select "Account" option from the list of items. Choose "Basic" plan. Check the coupon code and enter the coupon code that is given to you. Fill in your details such as First Name,Last Name and other details [Do NOT enter the credit card details].After successful subscription, you can proceed to the next steps.
You will get the following screen once you have logged in successfully. Now you need to create a server.Click "New Server" to create a server.

Type myserver-1 as the server name.
Choose Web application development: Node.js,Ruby on Rails
Make sure “Always-on “ Basic plan only is checked.
Press the “New server” button to proceed and create new server.

The server is created now.Press the little icon on the top left hand side to get the menu items. Read the menu so that you can choose the items appropriately.

There are two ways of generating a rails application. One way is to point to Rails -> rails new from the menu.

And, type in the name of the app that you want to create. I have used helloworldapp as my first application name. Press Run so that rails generate the framework for your app.

Another method to create an app is to click on New terminal from the menu and type
rails new helloworldapp
and hit enter. You can choose either of these methods to create a railsapp.
We strongly recommend to always use the terminal to create the rails application.

You will see that rails generates so many files for your application. Once it is completed, you will get a similar screen as below.

On the left side navigation bar, you will see that under /home/ubuntu folder your newly created helloworldapp is created. Go through it to see what all files are generated by rails.

Now, in order for you to work with your app, go back to your terminal and type
cd helloworldapp/
and press enter
Now you will be inside the helloworldapp folder.

Finally, we will see if rails is working fine and that we can access the application through our browser. You can achieve this step by typing the below command and press enter. You will see that the server has started.
rails server

To view the application in the browser, Open the menu and select the second option Browser(127.X.X.X:3000) or, on the left hand side , you will see a browser icon and you will get the Welcome screen from rails!

or


To download the project, right click on the helloworldapp folder and click Download to download the application to the machine.

If you used PaizaCloud, Git is already installed for you! If you installed locally on your Mac, please be sure Git is installed properly before continuing.
There are a number of graphical user interfaces available for Git if you installed locally on a Mac, but using the command line to manage Git is easy and will be what we use for all lab instructions. For the remainder of the lab today, we recommend you use the command line.
There are a number of online resources for Git. There is a nice cheat sheet here. Open one of these now in a browser for reference purposes. Also, note some nice Git resources at www.gitready.com that might also be helpful later in the course.
Create an account on [Github] (https://github.com/). You will have to replace "Your name" with your username and your "your@email.address" with the email you used here, in the next step.
Setup your git installation with your author's information. That way, when you make a commit, you are "signing" it so other developers know who made the commit.
 git config --global user.name "Your Name"
 git config --global user.email "your@email.address"
Note: The quotations are important.
In order to check the username and the email you entered please enter the following:
git config --list
(optional) If you installed locally, you can also configure your .gitconfig file to make output certain colors and handle other basic chores. My .gitconfig file can be seen in my dotfiles repo on github if you are looking for an example.
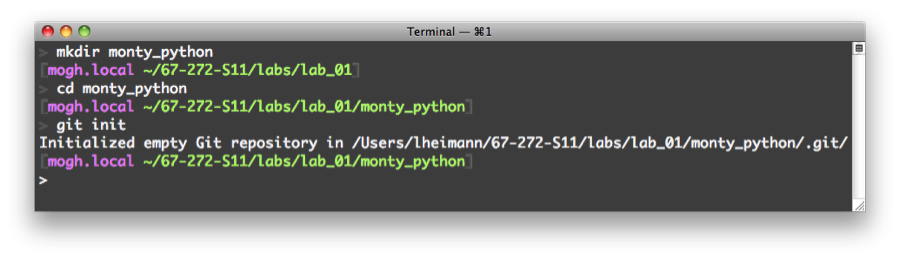
Start by creating a folder or directory somewhere called 'monty_python'.
mkdir monty_python
and then switch into that directory.
cd monty_python
Now in that directory, we will create a new git repository by typing:
git init
Here's a screenshot to help:
Note: If you are using PaizaCloud for this portion of the lab, either create a new workspace using the "Basic" template, or within your existing workspace navigate out of the workspace directory, using the terminal command cd ~ before making the new 'monty_python' directory.
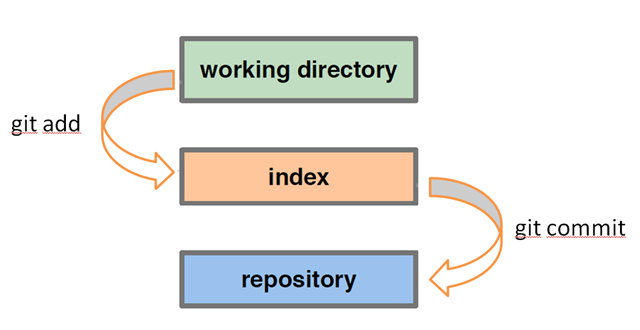
Within your working directory, create an empty file called holy_grail.txt:
touch holy_grail.txt
Now check that the file is untracked and needs sent to staging:
git status
Add the file to the staging area:
git add holy_grail.txt
Tip - You can hit
git status again and verify that the file is ready to commit.Here's a screenshot that may be helpful:

Following the same previous steps, add another file called life_of_brian.txt to the working directory.
Commit the files in staging to the repository:
git commit –m "Holy Grail, Life of Brian files added to project"
Tip - good messages are useful; always include a description message using the –m flag!
git status. Double check the change by running git log to see the list of commits:
b. Add a new file called completely_different.txt to the repository. Refer back to the previous instructions if necessary.
Show a TA that you have completed the first part. Make sure the TA initials your sheet.
Now that we have a basic Git repository set up and know how to add files, we need to also learn how to remove files and how to compare versions of the same file in different levels. Let's start with removal. In the git status help, we saw the note that if we want to remove a file from the staging level.
Remove the holy_grail.txt by typing the following:
git rm holy_grail.txt
and verify that it's gone from your working directory.
Oh snap! We didn't want to delete the file! I meant to use git rm --cached. Don't worry, it hasn't been removed from the repository yet - we've just marked the file for deletion.
Get the file back by using checkout:
git checkout HEAD holy_grail.txt
Note - HEAD is a pointer to your most recent commit. This could also be the SHA value of any previous commit.
Add another famous quote to holy_grail.txt.
Use git diff to see what has changed:
git diff

Stage and commit these changes:
 git add holy_grail.txt
 git commit -m "Added another quote to holy_grail.txt"
Add another quote to life_of_brian.txt and stage the file (git add life_of_brian.txt), but do not commit.
Run git diff:
git diff
You should not see any output. This is because the changes are staged and ready to be committed. If you want to see the difference between the staged version and the repository version, specify the --cached flag:
git diff --cached life_of_brian.txt
Reverse your changes to life_of_brian.txt:
git rm --cached life_of_brian.txt
We have decided that the completely_different.txt file was unnecessary. Using git, remove the file. (On your own - see a TA if you need assistance)
(optional) Add another file called pointless.txt and stage and commit it. Since that was pointless, I want to move back to the previous commit; I can do this by typing git checkout master^. (This is a relative commit name: master^ is the second most recent commit in master the branch. master~3 is the great grandparent (three before) of the most recent commit in the master branch.)
Notice now that the file pointless.txt is gone from your directory. You can get it back with git checkout master if you wish. I can also use absolute commit names and go all the way back to the beginning (in my case) with git checkout 24ac377, where this string is the commit name git assigned to my first commit (found it by using git log).
We need to add the new material from the Flying Circus to our project and to do this we will branch the project (if we don't like the changes, it will be very easy to just kill the branch and go back to master and try again – great way to safely experiment within the project).
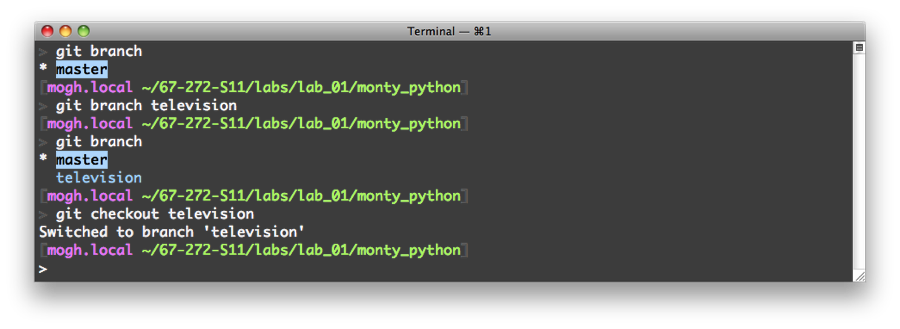
List all our current branches with:
git branch
The current (and only) branch is marked with a *.
Create a new branch called "television":
git branch television
Run git branch again to verify the branch exists.
Switch to the television branch:
git checkout television
Add a new file called flying_circus.txt with the quote:
"No one expects the Spanish Inquisition!"
Add this file to the repository with an appropriate message.
Return to the master branch:
git checkout master
You'll notice that the flying_circus.txt file disappeared! Not to worry - it will be back soon enough.
Create and switch to a new branch called "movies":
git checkout -b movies
Tip - in command, we created the branch and switched to it in one command by specifying the -b flag to git checkout.
On this new branch, add two new files:
touch meaning_of_life.txt mp_live.txt
Tip - touch is a *nix command for creating files
Commit these two files using what you learned earlier in the lab.
Checkout the master branch again (see previous commands for help).
Merge the movies branch back into the master branch:
git merge movies
Note - the branch movies still exists. If it's no longer needed, delete the branch with:
git branch -d movies
television branch.Notice that the new movie files are gone, but the flying_circus.txt is back in the working directory.
Add a new quote to flying_circus.txt (anything will do) and commit the change to the repository.
Merge the television branch back into the master branch (see #10..#11 for help).

There is obviously much more to Git, but this lab should get you familiar with the basics and started using Git and your proficiency should increase as you use it more in this course. Once the TA verifies the repo is set up, you are finished.
Be sure that the TA/professor checked your work and marked that in the checkout sheet.